Visual Studio Code
Requirements
macOS, Linux or Windows. Metals is developed on many operating systems and every PR is tested on Ubuntu, Windows and MacOS.
Scala 2.13, 2.12, 2.11 and Scala 3. Metals supports these Scala versions:
Scala 3 versions from 3.3.4 are automatically supported by Metals.
Any older Scala versions will no longer get bugfixes, but should still work properly with newest Metals.
Note that 2.11.x support is deprecated and it will be removed in future releases. It's recommended to upgrade to Scala 2.12 or Scala 2.13
Installation
Install the Metals extension from the
Marketplace
by clicking on this badge
![]() or via the VS Code editor:
or via the VS Code editor:
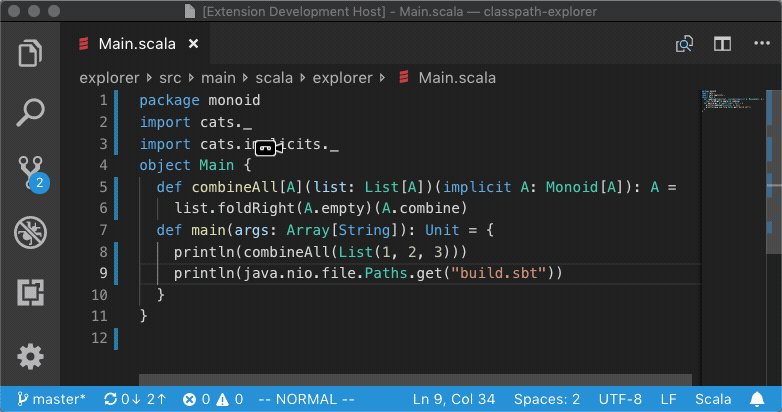
Next, open a directory containing your Scala code. The extension activates when
the main directory contains build.sbt or build.sc file, a Scala file is
opened, which includes *.sbt, *.scala and *.sc file, or a standard Scala
directory structure src/main/scala is detected.
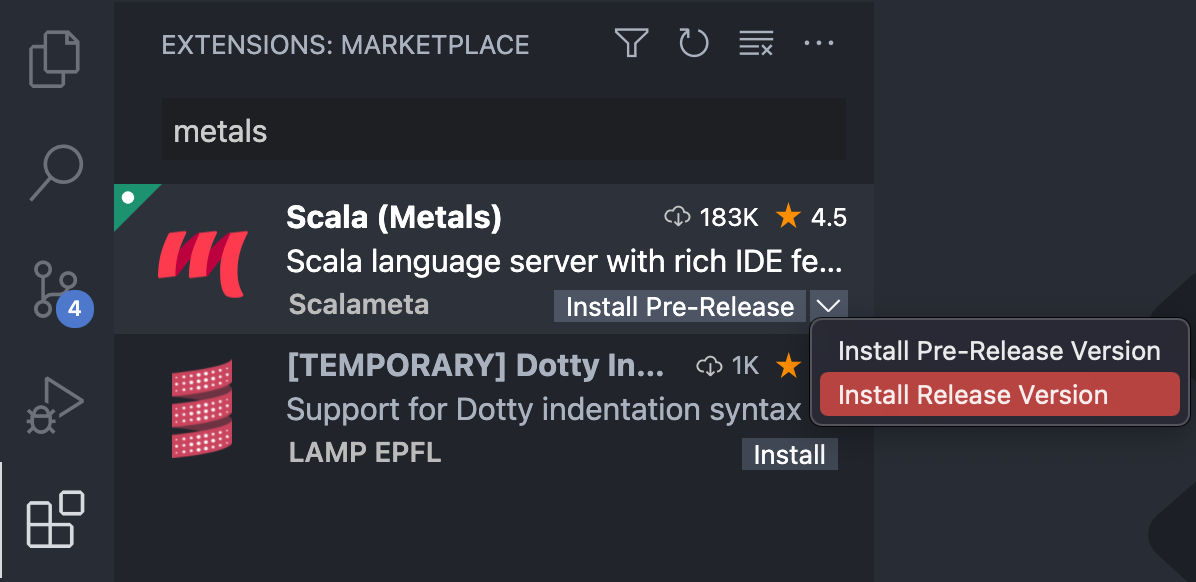
It is also possible to opt in to install the pre-release version and try out the
latest cutting edge features from Metals server. Apart from new features,
pre-release versions also include many bugfixes. It's encouraged to use them
with SNAPSHOT releases of Metals server. Using pre-release versions
may result in less stable experience and it is not intented for beginners.
Pre-release versions follow major.minor.PATCH versioning.

Importing a build
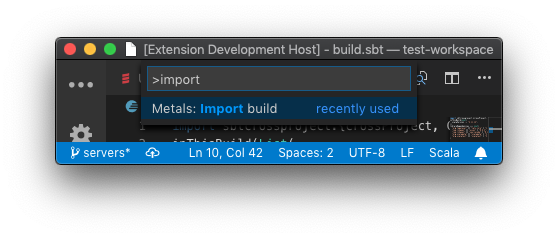
The first time you open Metals in a new workspace it prompts you to import the build. Click "Import build" to start the installation step.
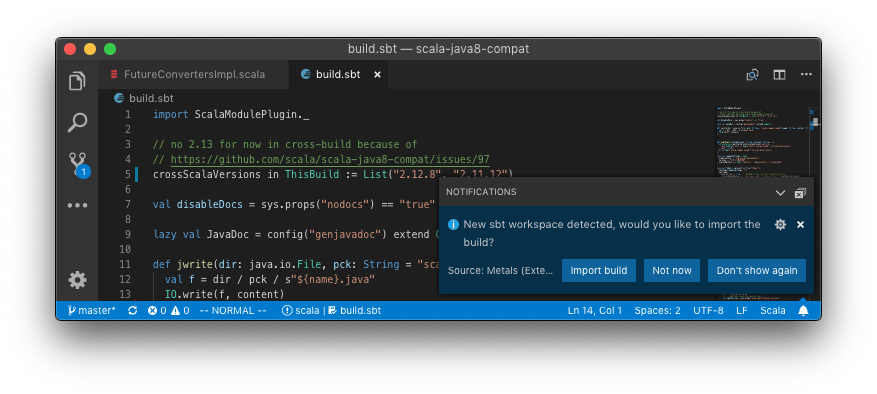
- "Not now" disables this prompt for 2 minutes.
- "Don't show again" disables this prompt forever, use
rm -rf .metals/to re-enable the prompt. - Use
tail -f .metals/metals.logto watch the build import progress. - Behind the scenes, Metals uses Bloop to import sbt builds, but you don't need Bloop installed on your machine to run this step.
Once the import step completes, compilation starts for your open *.scala
files.
Once the sources have compiled successfully, you can navigate the codebase with goto definition.
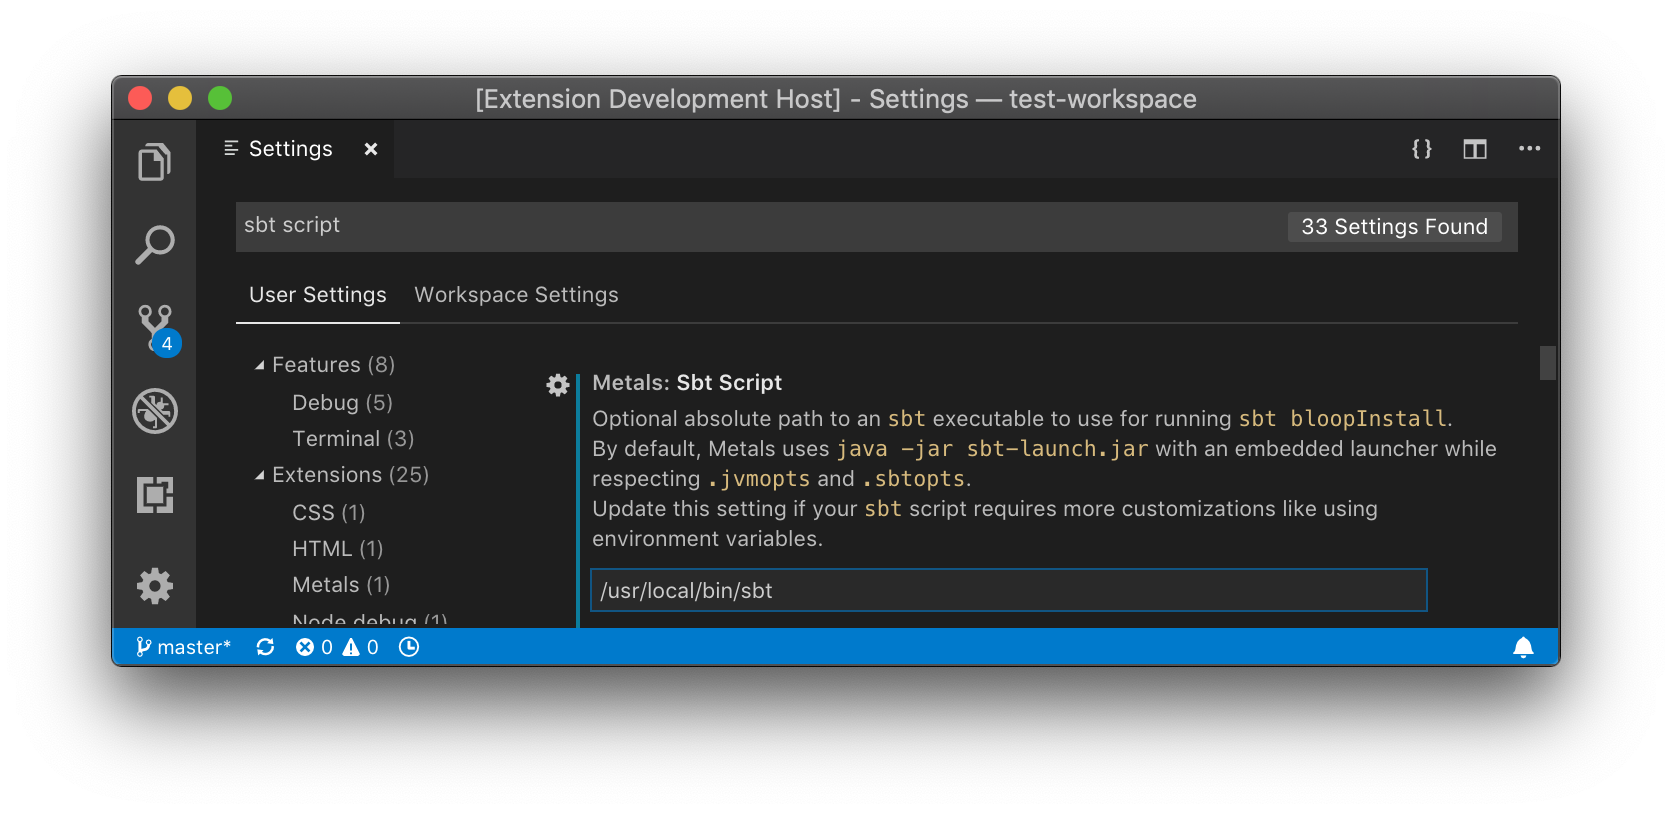
Custom sbt launcher
By default, Metals runs an embedded sbt-launch.jar launcher that respects .sbtopts and .jvmopts.
However, the environment variables SBT_OPTS and JAVA_OPTS are not respected.
Update the "Sbt Script" setting to use a custom sbt script instead of the
default Metals launcher if you need further customizations like reading environment
variables.
Speeding up import
The "Import build" step can take a long time, especially the first time you run it in a new build. The exact time depends on the complexity of the build and if library dependencies need to be downloaded. For example, this step can take everything from 10 seconds in small cached builds up to 10-15 minutes in large uncached builds.
Consult the Bloop documentation to learn how to speed up build import.
Importing changes
When you change build.sbt or sources under project/, you will be prompted to
re-import the build.

Manually trigger build import
To manually trigger a build import, execute the "Import build" command through
the command palette (Cmd + Shift + P).
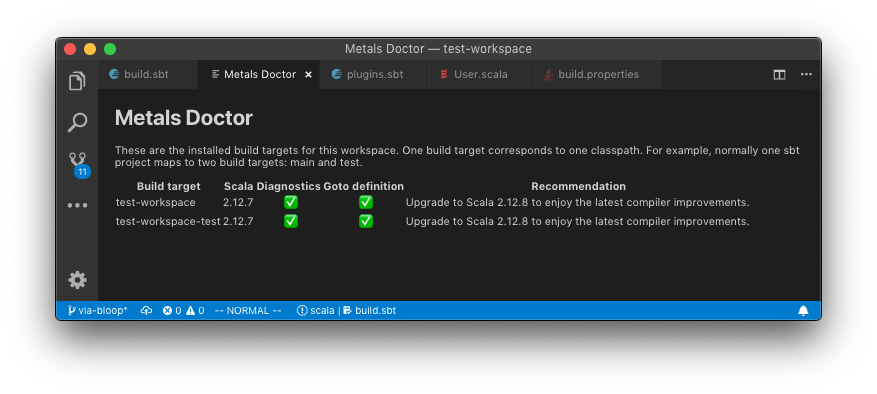
Run doctor
Execute the "Run Doctor" through the command palette to troubleshoot potential configuration problems in your workspace.
Configure Java version
Metals separates JDK used for starting Metals server from the JDK used for the project.
Metals's server JDK
Minimum supported version is 11. The VS Code plugin will first search for
java executable with version equal or greater than setting using JAVA_HOME
environment variable (via
locate-java-home).
If no matching Java found, a JDK will be downloaded using
coursier.
Settings:
Java Version- minimum JDK version accepted for running Metals server. If none found, this is also the version that will be downloaded using coursier. Allows for one of:11,17,21, with17being the default.
Project's JDK
JDK used for compiling and running the project. Build servers like mill and
sbt are started using that JDK. In case of Bloop Metals's server JDK is used
for running the build server but appropriate -release flags are added for
compilation. By default Metals uses JDK defined by JAVA_HOME environment
variable, if the variable is not set is falls to using the Metals's JDK.
Settings:
Java Home- path to project's JDK's Home. Note: this setting isn't respected forBazel.
Note: Project's JDK version should be greater or equal to Metals's server JDK version for features like completions to work correctly.
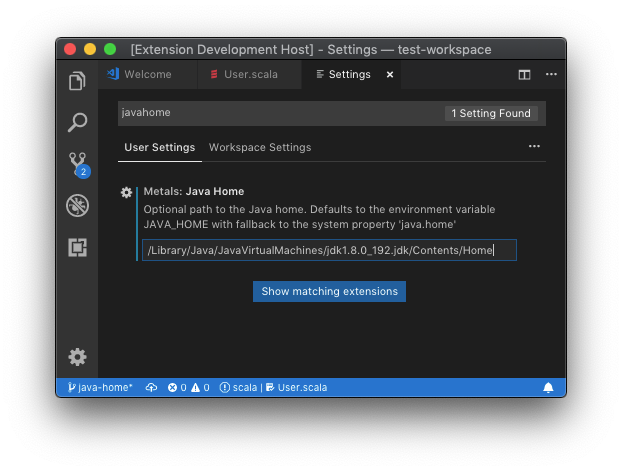
macOS
To globally configure $JAVA_HOME for all GUI applications, see
this Stackoverflow answer.
If you prefer to manually configure Java home through VS Code, run the following command to copy the Java 8 home path.
/usr/libexec/java_home -v 1.8 | pbcopy
Custom artifact repositories (Maven or Ivy resolvers)
Use the 'Custom Repositories' setting for the Metals VS Code extension to tell Coursier to try to download Metals artifacts from your private artifact repository.
Use .jvmopts to set sbt options
(https://www.scala-sbt.org/1.0/docs/Proxy-Repositories.html) for
sbt bloopInstall which resolves library dependencies. You can also provide a
custom sbt script (see 'Custom sbt launcher').
HTTP proxy
Metals uses Coursier to download
artifacts from Maven Central. To use Metals behind an HTTP proxy, configure the
system properties -Dhttps.proxyHost=… -Dhttps.proxyPort=… in one of the
following locations:
.jvmoptsfile in the workspace directory.JAVA_OPTSenvironment variable, make sure to startcodefrom your terminal when using this option since environment variables don't always propagate correctly when opening VS Code as a GUI application outside a terminal.- "Server Properties" setting for the Metals VS Code extension, which can be configured per-workspace or per-user.
Using latest Metals SNAPSHOT
Update the "metals.serverVersion" setting to try out the latest pending Metals
features and fixes. To open settings go to File -> Preferences -> Settings and
then use the search to find the specific option.
| Version | Published |
|---|---|
| 1.6.7 | 07 Apr 2026 13:37 |
| 1.6.7+140-c7402f4b-SNAPSHOT | 22 Jul 2026 14:01 |
Run the "Reload Window" command after updating the setting for the new version to take effect.
Files and Directories to include in your Gitignore
The Metals server places logs and other files in the .metals directory. The
Bloop compile server places logs and compilation artifacts in the .bloop
directory. The Bloop plugin that generates Bloop configuration is added in the
metals.sbt file, which is added at project/metals.sbt as well as further
project directories depending on how deep *.sbt files need to be supported.
To support each *.sbt file Metals needs to create an additional file at
./project/project/metals.sbt relative to the sbt file.
Working with Scala CLI scripts will place compiled scripts into the .scala-build directory.
It's recommended to exclude these directories and files
from version control systems like git.
# ~/.gitignore
.metals/
.bloop/
.scala-build/
metals.sbt
To have the Bloop server shut down when you close VS Code, enable the
metals.shutdownBloopOnEditorClose setting (machine-scoped). Bloop is only shut
down when the last VS Code window that had Metals open is closed; with
multiple windows open, it keeps running until the last one closes. See
metals-feature-requests#129
for more context.
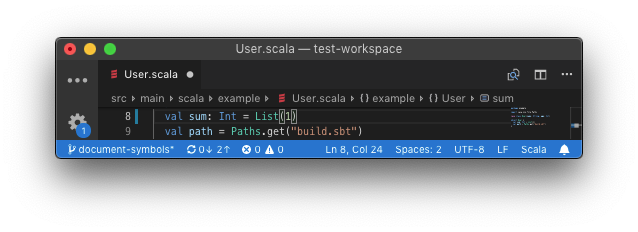
Show document symbols
Run the "Explorer: Focus on Outline View" command to open the symbol outline for the current file in the sidebar.
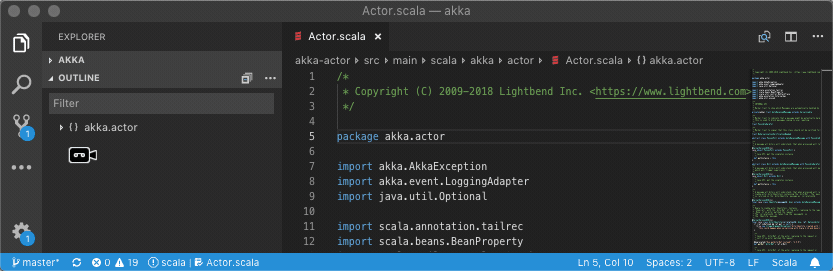
Run the "Open Symbol in File" command to search for a symbol in the current file without opening the sidebar.
As you type, the symbol outline is also visible at the top of the file.
Go to parent code lenses
Metals has the ability to display code lenses that, when invoked, will go to the parent class that contains the definition of the method or symbol. Unfortunately, it might cause some lag in larger code bases, which is why it is not enabled currently by default.
To enable the feature you need to modify the setting metals.superMethodLensesEnabled to true.
Even without using the code lenses it's still possible to navigate the method hierarchy using two commands:
-
Metals: Go to super method- immediately goes to the parent of the method the cursor is pointing to -
Metals: Reveal super method hierachy- displays the full method hierachy and enables to move to any parent, it is best used with the Metals Quick Pick extension.
You can also bind those commands to a shortcut.
Create new project from template
It is possible using Metals to easily setup a new project using the exiting giter8 templates.
This is an equivalent to the sbt new command, which uses the same mechanism.
There is a great number of templates already available and it should be easy to find something for yourself.
To start the setup you can use the Metals: New Scala project command, which works as following:
-
Choose the template and then:
- Use the proposed templates.
- Choose "Discover more" and then choose from the list downloaded from the Giter8 wiki page.
- Input a custom Github repository following the
organization/reposchema.
-
Navigate to the parent directory that you want to create your new project in.
-
Choose the name or accept the default one.
-
Choose whether to open a new window for the created project or use the existing one.
The same command will be invoked when clicking the "New Scala Project" button in the Metals view.
If you feel like a template should be included in the default displayed ones do not hesitate to create a PR or file an issue.
Running and debugging your code
Metals supports running and debugging tests and main methods via the
Debug Adapter Protocol.
The protocol is used to communicate between the editor and debugger, which means
that applications can be run the same as for any other language in the natively
supported Run view. When using Metals the debugger itself is
Bloop, which is also responsible for
starting the actual process.
Users can begin the debugging session in four ways:
via test explorer
Since version 0.11.0 Metals implements Visual Studio Code's Testing API.
Test Explorer UI is a new default way to run/debug test suites and replaces Code Lenses. The new UI adds a testing view, which shows all test suites declared in project's modules. From this panel it's possible to
- view all discovered test suites grouped by build targets (modules) and filter them
- run/debug test
- navigate to test's definition.
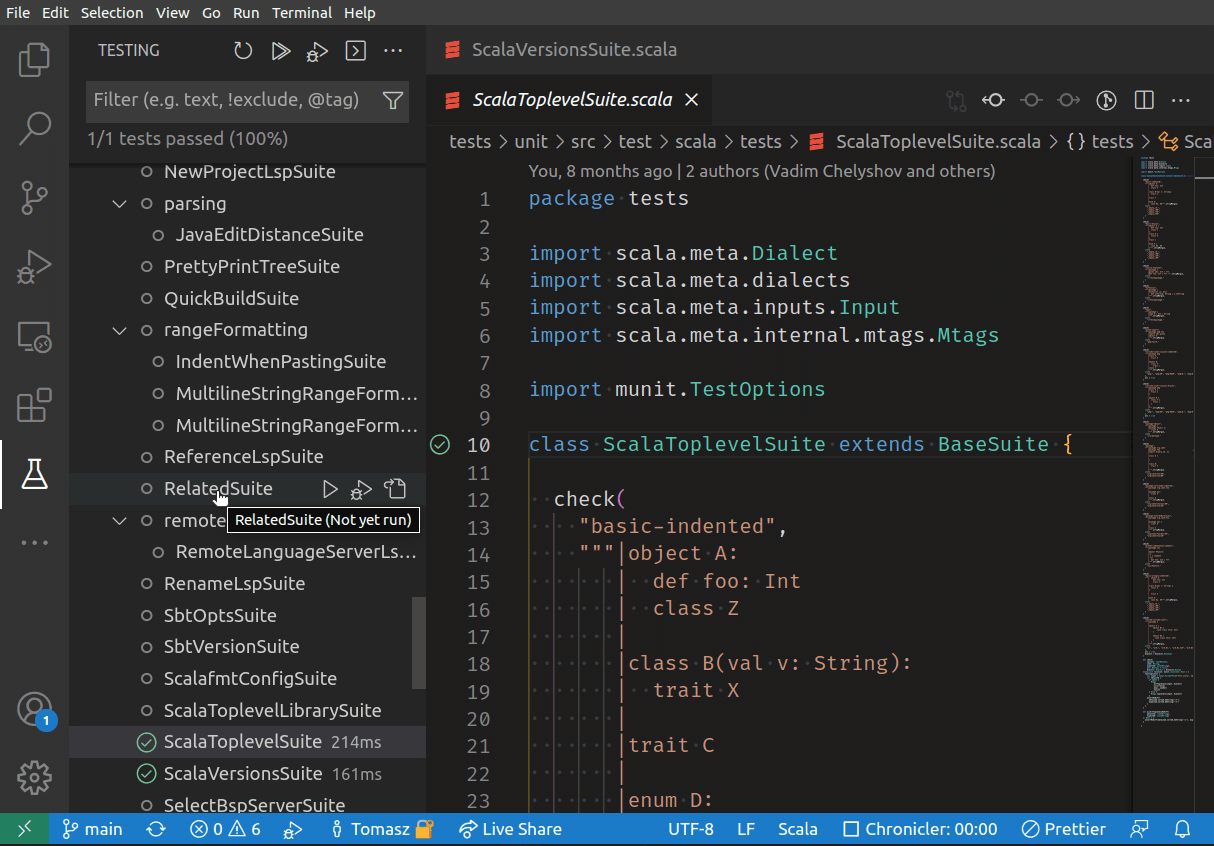
NOTE: While Metals detects test suites for most of existing testing frameworks, support for recognizing individual tests is more limited. Metals supports the current set of test frameworks when it comes to individual test discovery:
- Junit
- MUnit
- Scalatest
- Weaver Test
If you encounter an error, create an issue.
via code lenses
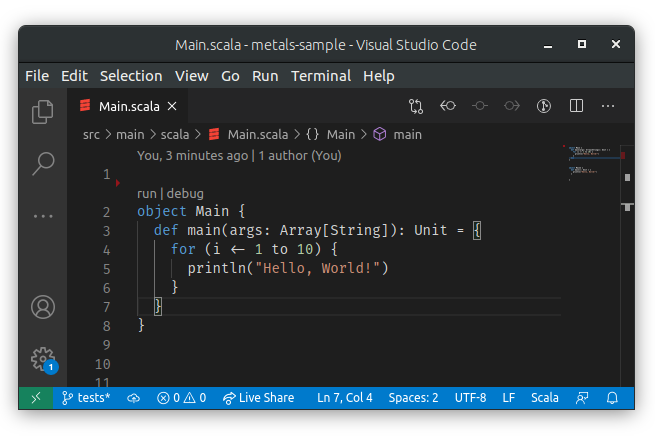
For each main or test class Metals shows two code lenses run | debug or
test | test debug, which show up above the definition as a kind of virtual
text. Clicking run or test will start running the main class or test without
stopping at any breakpoints, while clicking debug or test debug will pause
once any of them are hit. It's not possible to add any arguments or java
properties when running using this method.
via a launch.json configuration
Visual Studio Code uses .vscode/launch.json to store user defined
configurations, which can be run using:
- The
Run -> Start Debuggingmenu item orworkbench.action.debug.startshortcut. - The
Run -> Run Without Debuggingmenu item orworkbench.action.debug.runshortcut.
If a user doesn't have anything yet saved, a configuration wizard will pop up to guide them. In the end users should end up with something like this:
{
  "version": "0.2.0",
  "configurations": [
    // Main class configuration
    {
      "type": "scala",
      "request": "launch",
      // configuration name visible for the user
      "name": "Launch Main",
      // full name of the class to run
      "mainClass": "com.example.Main",
      // optional arguments for the main class
      "args": [],
      // optional jvm properties to use
      "jvmOptions": []
    },
    // Test class configuration
    {
      "type": "scala",
      "request": "launch",
      // configuration name visible for the user
      "name": "Launch Test",
      // full name of the class to run
      "testClass": "com.example.Test"
    },
    // Attach debugger when running via:
    // `-agentlib:jdwp=transport=dt_socket,server=y,suspend=n,address=localhost:5005`
    {
      "type": "scala",
      "request": "attach",
      "name": "Attach debugger",
      // name of the module that is being debugging
      "buildTarget": "root",
      // Host of the jvm to connect to
      "hostName": "localhost",
      // Port to connect to
      "port": 5005
    }
  ]
}
You can also add an optional build target name, which is needed in case there
are more than one class with the same name or when launching a class from
outside the project. Inside "configurations": add the key buildTarget with
your target name, e.g. root:
"buildTarget": "root"
The build target name corresponds to your project name. For example in sbt for
lazy val interfaces = project the name of the build target will be
interfaces for sources and interfaces-test for tests. To make sure you have
the correct target names please run the command Metals: Run Doctor.
Multiple configurations can be stored in that file and can be chosen either
manually in the Run view or can be picked by invoking a shortcut defined under
workbench.action.debug.selectandstart.
via Metals' commands
You can also use commands that can be easily bound to shortcuts:
metals.run-current-file- Run main class in the current file.metals.test-current-file- Run test class in the current filemetals.test-current-target- Run all tests in the current project.
To assign shortcuts just go to the Keyboard Shortcuts page (File ->
Preferences -> Keyboard Shortcuts) and search for a command, click on it and
use your preferred shortcut.
Defining jvm options
Unfortunately, it's not always possible to define environment variables or jvm options for tests. To work around that you can use:
.jvmoptsfile inside the main project directory orJVM_OPTSenvironment variable. In this case, we will filter out any -X options as it might sometimes be problematic if the file is also used for specifying build tools' options..test-jvmoptsfile orTEST_JVM_OPTSif you want to declare jvm options only for your tests and/or you also want to use -X options.
This will work for any method used to run tests.
Debugging Scala Native
To debug Scala Native applications, you need to use the
LLDB DAP
extension and modify the launch.json configuration according to the extension
README.
You should also us make sure all all optimizations are turned off and
SourceLevelDebuggingConfig is fully enabled. This can be done by adding the
following to your build.sbt:
import scala.scalanative.build._

nativeConfig ~= { c =>
  c.withSourceLevelDebuggingConfig(_.enableAll) // enable generation of debug information
  .withOptimize(false)  // disable Scala Native optimizer
  .withMode(Mode.debug) // compile using LLVM without optimizations
}
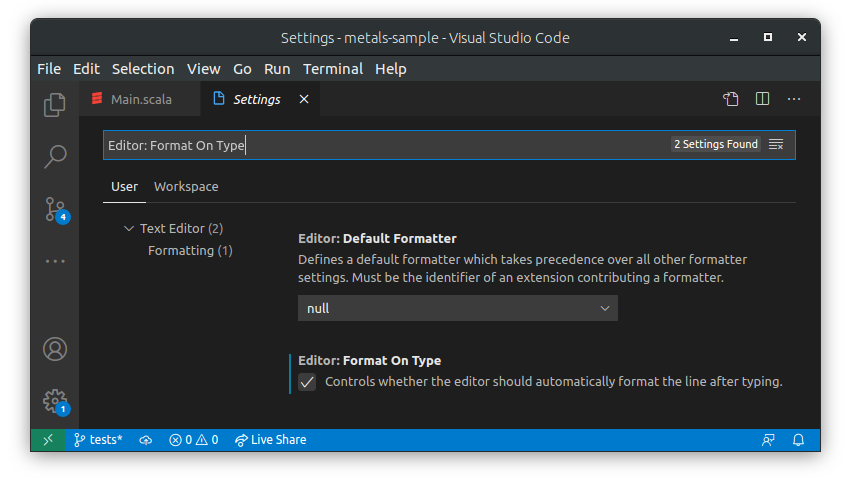
On type formatting for multiline string formatting
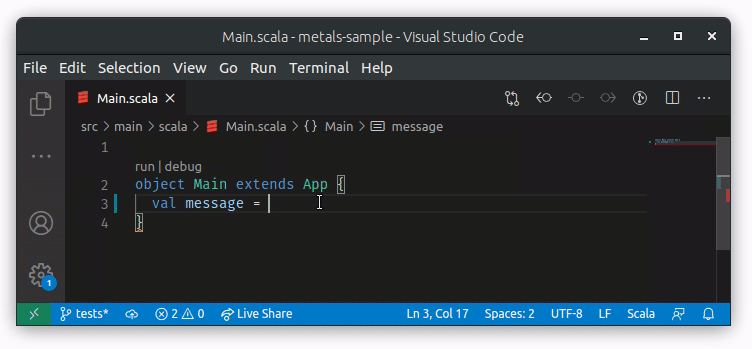
To properly support adding | in multiline strings we are using the
onTypeFormatting method. The functionality is enabled by default, but you can
disable/enable onTypeFormatting inside Visual Studio Code settings by checking
Editor: Format On Type:
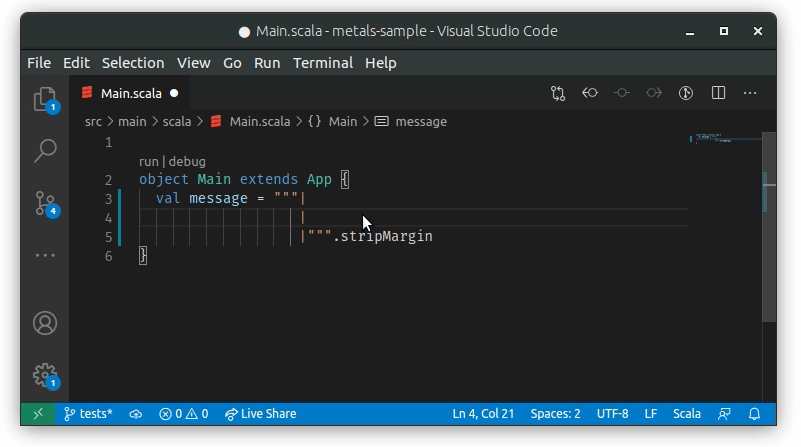
Formatting on paste for multiline strings
Whenever text is paste into a multiline string with | it will be properly
formatted by Metals:
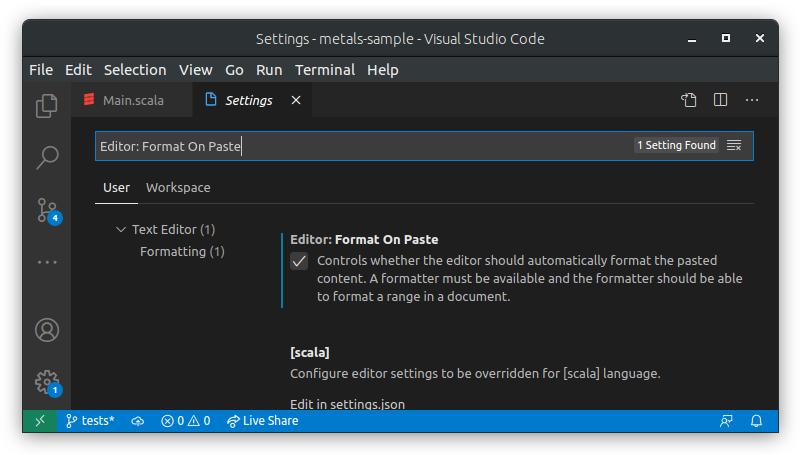
This feature is enabled by default. If you need to disable/enable formatting on
paste in Visual Studio Code you can check the Editor: Format On Paste setting:
Worksheets
Worksheets are a great way to explore an api, try out an idea, or code up an example and quickly see the evaluated expression or result. Behind the scenes worksheets are powered by the great work done in mdoc.
Getting started with Worksheets
To get started with a worksheet you can either use the metals.new-scala-file
command and select Worksheet or create a file called *.worksheet.sc.
This format is important since this is what tells Metals that it's meant to be
treated as a worksheet and not just a Scala script. Where you create the
script also matters. If you'd like to use classes and values from your
project, you need to make sure the worksheet is created inside of your sources next to any existing Scala files.
directory. You can still create a worksheet in other places, but you will
only have access to the standard library and your dependencies.
Evaluations
After saving you'll see the result of the expression as a inlay hint at the end of the line. You may not see the full result for example if it's too long, so you are also able to hover on the inlay hint to expand it.
Keep in mind that you don't need to wrap your code in an object. In worksheets
everything can be evaluated at the top level.
Using dependencies in worksheets
You are able to include an external dependency in your worksheet by including it with using directives:
//> using dep com.lihaoyi::scalatags:0.7.0
:: is the same as %% in sbt, which will append the current Scala binary version
to the artifact name.
You can also import scalac options in a special $$scalac import like below:
//> using options -Ywarn-unused
Troubleshooting
Since worksheets are not standard Scala files, you may run into issues with some constructs. For example, you may see an error like this:
value classes may not be a member of another class - mdoc
This means that one of the classes defined in the worksheet extends AnyVal, which is not currently supported. You can work around this by moving the class to a separate file or removing the AnyVal parent.
Running scalafix rules
Scalafix allows users to specify some refactoring and linting rules that can be applied to your codebase. Please checkout the scalafix website for more information.
Since Metals v0.11.7 it's now possible to run scalafix rules using a special
command metals.scalafix-run. In VS Code can be also run using the default shortcut of shift + alt + ctrl + o.
This should run all the rules defined in your .scalafix.conf file. All built-in rules
and the community hygiene ones can
be run without any additional settings. However, for all the other rules users need to
add an additional dependency in the metals.scalafixRulesDependencies user setting.
Those rules need to be in form of strings such as com.github.liancheng::organize-imports:0.6.0, which
follows the same convention as coursier dependencies.
A sample scalafix configuration can be seen below:
rules = [
  OrganizeImports,
  ExplicitResultTypes,
  RemoveUnused
]

RemoveUnused.imports = false

OrganizeImports.groupedImports = Explode
OrganizeImports.expandRelative = true
OrganizeImports.removeUnused = true
OrganizeImports.groups = [
  "re:javax?\."
  "scala."
  "scala.meta."
  "*"
]
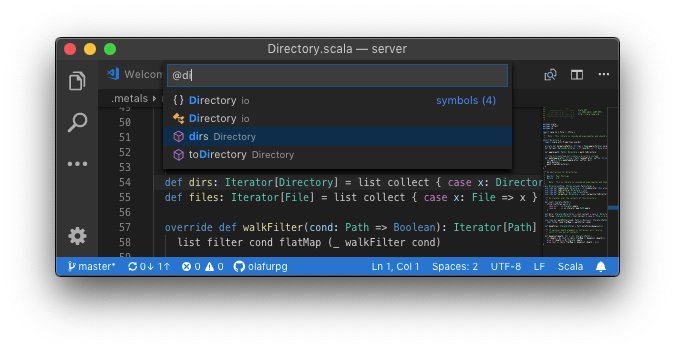
Searching a symbol in the workspace
Metals provides an alternative command to the native "Go to symbol in workspace..." command, in order to work around some VS Code limitations (see this issue for more context) and provide richer search capabilities.
You can invoke this command from the command palette (look for "Metals: Search symbol in workspace"). Optionally you can also bind this command to a shortcut. For example, if you want to replace the native command with the Metals one you can configure this shortcut:
  {
    "key": "ctrl+t", // or "cmd+t" if you're on macOS
    "command": "metals.symbol-search",
    "when": "editorLangId == scala"
  }
Coming from IntelliJ
Install the IntelliJ IDEA Keybindings extension to use default IntelliJ shortcuts with VS Code.
| IntelliJ | VS Code |
|---|---|
| Go to class | Go to symbol in workspace |
| Parameter info | Trigger parameter hints |
| Basic completion | Trigger suggest |
| Type info | Show hover |
| Expand | Fold |
| Extend Selection | Expand selection |
GitHub Codespaces and GitHub.dev support
See https://scalameta.org/metals/docs/editors/online-ides#github-codespaces-and-githubdev